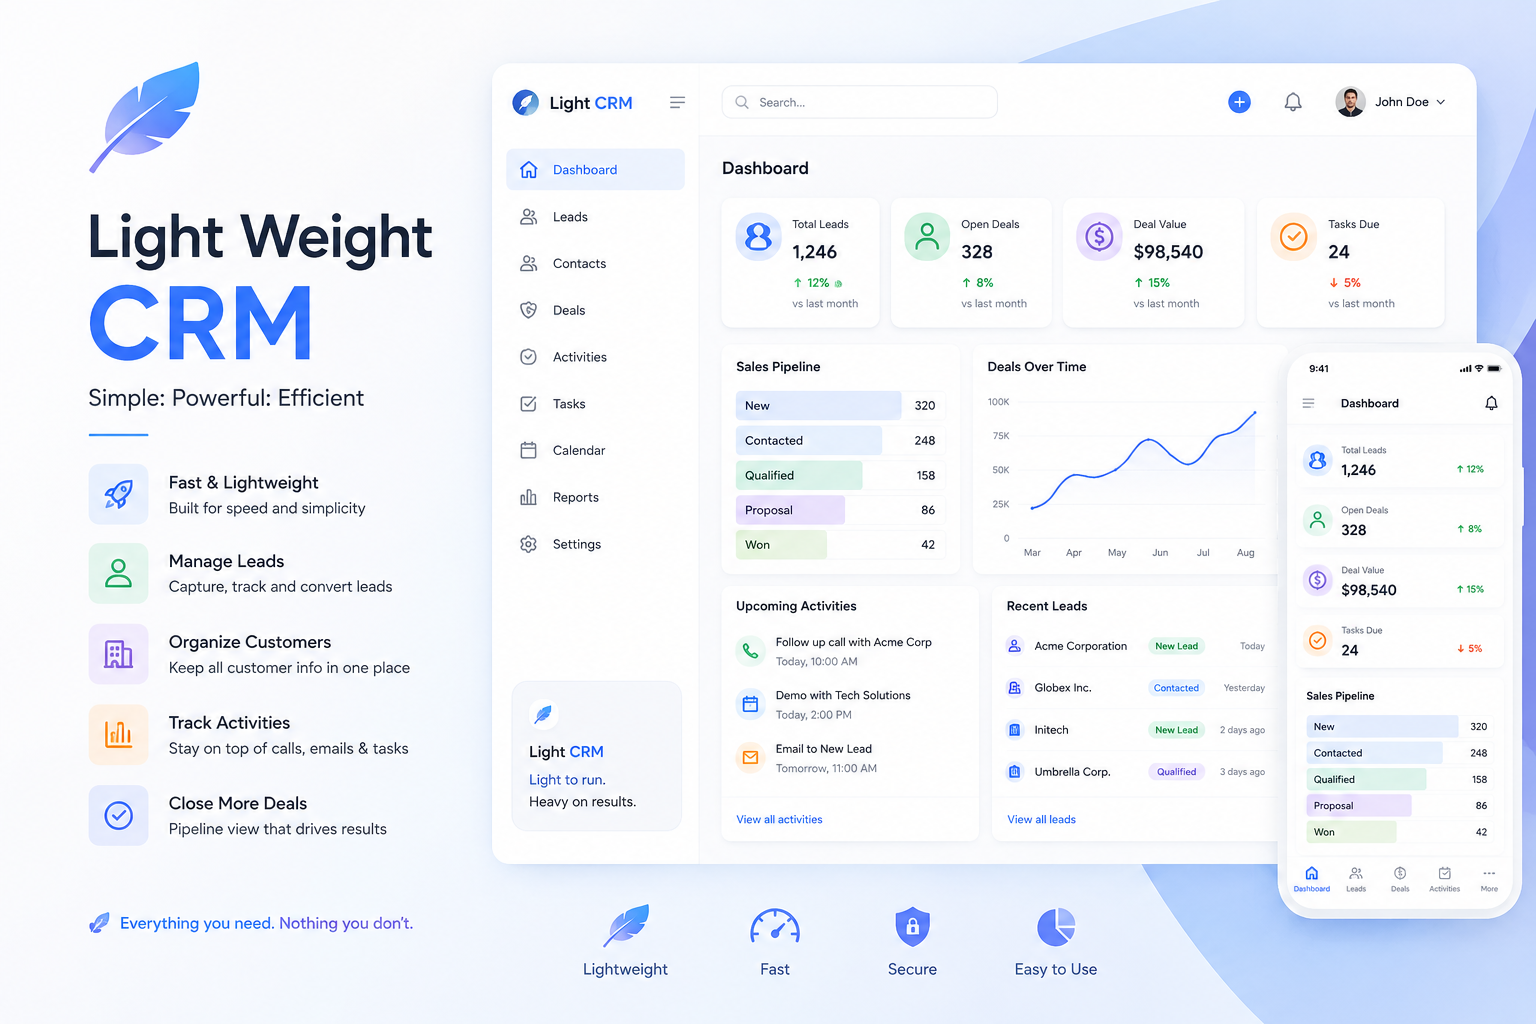
For growing businesses, independent creators, and agile teams, Customer Relationship Management (CRM) software is a core operational hub. However, modern commercial CRM platforms frequently suffer from over-engineering. Users find themselves trapped in complex ecosystems, paying steep monthly subscription fees for hundreds of features they will never use.
If your workflow only demands contact tracking, pipeline management, and communication logging, building a custom tool from the ground up is often the most efficient path. This guide provides a comprehensive technical blueprint to build a lightweight, self-hosted CRM from scratch using a clean Python backend coupled with a responsive HTML5 and CSS3 frontend.
1. System Architecture: The “Clean Slate” Philosophy
To maintain speed, portability, and zero infrastructure costs, this custom CRM relies on a streamlined, self-contained architecture:
                  [ FRONTEND ]
             HTML5 / CSS3 / Vanilla JS
                        │
             HTTP Requests / Forms
                        ▼
                 [ BACKEND ]
             Python (Flask / SQLite)
                        │
               SQL Queries / ORM
                        ▼
                [ DATABASE ]
              SQLite (Local File)
- The Backend (Python + Flask): Flask serves as a minimalist micro-framework. It handles routing, processes HTML form data, and serves dynamic content without the heavy overhead of larger frameworks like Django.
- The Database (SQLite): SQLite stores your data locally in a single file (
crm.db). It requires zero server configuration, zero maintenance, and handles thousands of relational records with ease. - The Frontend (HTML5 + CSS3): Written entirely from scratch. By writing custom, semantic CSS instead of loading heavy frameworks like Tailwind or Bootstrap, the interface loads instantly and functions independently of external content delivery networks (CDNs).
2. Setting Up the Relational Database
A reliable CRM depends on cleanly structured data. For this lightweight application, a simple relational schema containing two interconnected tables—contacts and interaction_logs—is ideal.
Here is the setup script (database.py) using Python’s built-in sqlite3 library to initialize the database:
Python
import sqlite3

def initialize_database():
    connection = sqlite3.connect('crm.db')
    cursor = connection.cursor()

    # Create Contacts Table
    cursor.execute('''
        CREATE TABLE IF NOT EXISTS contacts (
            id INTEGER PRIMARY KEY AUTOINCREMENT,
            name TEXT NOT NULL,
            email TEXT UNIQUE NOT NULL,
            phone TEXT,
            company TEXT,
            status TEXT DEFAULT 'Lead'
        )
    ''')

    # Create Interaction Logs Table (One-to-Many Relationship)
    cursor.execute('''
        CREATE TABLE IF NOT EXISTS interaction_logs (
            id INTEGER PRIMARY KEY AUTOINCREMENT,
            contact_id INTEGER,
            date TEXT NOT NULL,
            summary TEXT NOT NULL,
            type TEXT NOT NULL,
            FOREIGN KEY (contact_id) REFERENCES contacts(id) ON DELETE CASCADE
        )
    ''')

    connection.commit()
    connection.close()

if __name__ == '__main__':
    initialize_database()
    print("Database initialized successfully as 'crm.db'.")
3. Engineering the Python Application Layer
With the database active, the Flask application layer manages dynamic server routing, handles record entry, and pulls contextual interaction histories. Save this script as app.py:
Python
from flask import Flask, render_template, request, redirect, url_for
import sqlite3
from datetime import datetime

app = Flask(__name__)

def query_db(query, args=(), one=False):
    connection = sqlite3.connect('crm.db')
    connection.row_factory = sqlite3.Row
    cursor = connection.cursor()
    cursor.execute(query, args)
    records = cursor.fetchall()
    connection.commit()
    connection.close()
    return (records[0] if records else None) if one else records

@app.route('/')
def dashboard():
    # Fetch all contacts for the main pipeline view
    contacts = query_db('SELECT * FROM contacts ORDER BY id DESC')
    return render_template('dashboard.html', contacts=contacts)

@app.route('/contact/add', methods=['POST'])
def add_contact():
    name = request.form['name']
    email = request.form['email']
    phone = request.form['phone']
    company = request.form['company']

    query_db('''
        INSERT INTO contacts (name, email, phone, company)
        VALUES (?, ?, ?, ?)
    ''', (name, email, phone, company))

    return redirect(url_for('dashboard'))

@app.route('/contact/<int:contact_id>')
def view_contact(contact_id):
    contact = query_db('SELECT * FROM contacts WHERE id = ?', (contact_id,), one=True)
    logs = query_db('SELECT * FROM interaction_logs WHERE contact_id = ? ORDER BY date DESC', (contact_id,))
    return render_template('contact_detail.html', contact=contact, logs=logs)

@app.route('/contact/<int:contact_id>/log', methods=['POST'])
def log_interaction(contact_id):
    summary = request.form['summary']
    interaction_type = request.form['type']
    current_date = datetime.now().strftime('%Y-%m-%d %H:%M')

    query_db('''
        INSERT INTO interaction_logs (contact_id, date, summary, type)
        VALUES (?, ?, ?, ?)
    ''', (contact_id, current_date, summary, interaction_type))

    return redirect(url_for('view_contact', contact_id=contact_id))

if __name__ == '__main__':
    app.run(debug=True, port=5000)
4. Creating a Clean, Custom User Interface
To ensure optimal rendering speeds and eliminate third-party code dependencies, the interface relies purely on semantically structured HTML5 and standard CSS layout properties.
The Dashboard Layout (templates/dashboard.html)
This file builds the split-pane control dashboard, matching an input console alongside a responsive interaction board.
HTML
<!DOCTYPE html>
<html lang="en">
<head>
<meta charset="UTF-8">
<meta name="viewport" content="width=device-width, initial-scale=1.0">
<title>SlateCRM - Dashboard</title>
<style>
:root {
--bg-primary: #121214;
--bg-surface: #1a1a1e;
--text-main: #e1e1e6;
--text-muted: #a8a8b3;
--accent: #4ade80;
--border: #29292e;
}
body {
font-family: -apple-system, BlinkMacSystemFont, "Segoe UI", Roboto, sans-serif;
background-color: var(--bg-primary);
color: var(--text-main);
margin: 0;
padding: 2rem;
}
.container {
max-width: 1200px;
margin: 0 auto;
display: grid;
grid-template-columns: 350px 1fr;
gap: 2rem;
}
.card {
background-color: var(--bg-surface);
border: 1px solid var(--border);
border-radius: 8px;
padding: 1.5rem;
}
h2 { margin-top: 0; color: var(--accent); }
label { display: block; margin: 0.8rem 0 0.2rem; color: var(--text-muted); }
input, select {
width: 100%;
padding: 0.6rem;
background: var(--bg-primary);
border: 1px solid var(--border);
color: var(--text-main);
border-radius: 4px;
box-sizing: border-box;
}
button {
margin-top: 1.2rem;
width: 100%;
padding: 0.7rem;
background: var(--accent);
border: none;
color: #000;
font-weight: bold;
border-radius: 4px;
cursor: pointer;
}
table {
width: 100%;
border-collapse: collapse;
margin-top: 1rem;
}
th, td {
text-align: left;
padding: 0.8rem;
border-bottom: 1px solid var(--border);
}
th { color: var(--text-muted); }
a { color: var(--accent); text-decoration: none; }
a:hover { text-decoration: underline; }
</style>
</head>
<body>
<div class="container">
<!-- Sidebar: Add Contact Form -->
<div class="card">
<h2>Add New Contact</h2>
<form action="/contact/add" method="POST">
<label>Full Name</label>
<input type="text" name="name" required autocomplete="off">
<label>Email Address</label>
<input type="email" name="email" required autocomplete="off">
<label>Phone Number</label>
<input type="text" name="phone" autocomplete="off">
<label>Company</label>
<input type="text" name="company" autocomplete="off">
<button type="submit">Save Contact</button>
</form>
</div>
<!-- Main Content Panel: Contact Index -->
<div class="card">
<h2>Active Contacts Pipeline</h2>
<table>
<thead>
<tr>
<th>Name</th>
<th>Company</th>
<th>Email</th>
<th>Status</th>
<th>Action</th>
</tr>
</thead>
<tbody>
{% for contact in contacts %}
<tr>
<td><strong>{{ contact.name }}</strong></td>
<td>{{ contact.company or '-' }}</td>
<td>{{ contact.email }}</td>
<td>{{ contact.status }}</td>
<td><a href="/contact/{{ contact.id }}">View History →</a></td>
</tr>
{% endfor %}
</tbody>
</table>
</div>
</div>
</body>
</html>
5. Deployment Options & Long-Term Maintenance
Because this system runs on standard Python web protocols and keeps its local database in a single lightweight file, deployment and maintenance are exceptionally simple:
- Local Office Deployment: You can run this CRM directly on a local desktop network. By running
app.pyand setting Flask to expose the port locally (host='0.0.0.0'), anyone connected to the local office Wi-Fi can securely access the platform at the machine’s local IP address. - Zero-Cost Cloud Deployment: For remote team access, this architecture can be deployed seamlessly to platforms like Render, Railway, or a basic digital ocean droplet.
- Automated Backups: Since the entire system lives inside
crm.db, you don’t need complex database dumps. Setting up a basic automation script—or running a daily cron job—to copy the database file to an encrypted cloud storage folder gives you a complete, foolproof backup pipeline.
By writing clean Python code and stripping away third-party software dependencies, you create a private, lightning-fast CRM system tailored precisely to your team’s workflows—with zero recurring overhead.
Reference Links
- Python Official Documentation: https://www.python.org/
- Flask Microframework Documentation: https://flask.palletsprojects.com/
- SQLite Standard Library Reference: https://www.sqlite.org/




+ There are no comments
Add yours